Kawasaki World banner

Guide to changing the color on the ZX12R LCD Display

34K views 110 replies 24 participants last post by  TXsoloRIDER  
#1 ·
OK here is my Guide to changing the color on the ZX12R LCD Display

Please bear with the pics the camera i borrowed doesn't do macro shots very well
i tried to cover all the aspects of the mod i have left out the stuff that i think doesn't
need explanation but i may have missed something if so let me know and i will gladly
update this guide


Tools And Supplies needed

Phillips Screw Driver
Hot Glue Gun
Soldering Iron,and Solder
Sand Paper for sanding and frosting LEDs
Small Heat Shrink Tubing
2 470 ohm 1/2W 5% Carbon Film Resistors
Radio Shack (Model: 271-1115 | Catalog #: 271-1115 )
Image


4 Rectangular High-Brightness Blue LED Lamp
Radio Shack (Model: 276-013 | Catalog #: 276-013)
Image


First Step remove the 6 screws and separate the back from the Speedo
then locate the 4 tabs that need to be bent to remove LCD Display

Image


Once the LCD Display is removed you will find under the LCD an Orange Filter
Remove and discard then if your white reflector is damaged like mine flip it over so

the white side faces the LCD screen
Image


Image


Image


Image


Image


The LEDs are a bit to long to fit well so you will need to sand them down shorter
and frost the ends. We need to do this so the light from the LEDS will defuse better
if you don't frost them the light will be very directional and you will see blue streaks

of light instead of a soft glow

Image


Hot Glue the LEDs in Place that will give you a solid mount and be easier to bend the
leads to where you need them

flip over to the back of the Speedo and solder the resistors in and solder the grounds
from the LEDs

Image


Image


Image


once thats done flip back over and solder the 2 leads for power together,and the other

end of the resistor that you have through the hole from the back
to the LEDs positive leads. Make sure the wire leads from power and ground don't touch!!
don't worry about them touching once separated we will cover them in hot glue later and

they will be fully insulated


Image


Image


Image


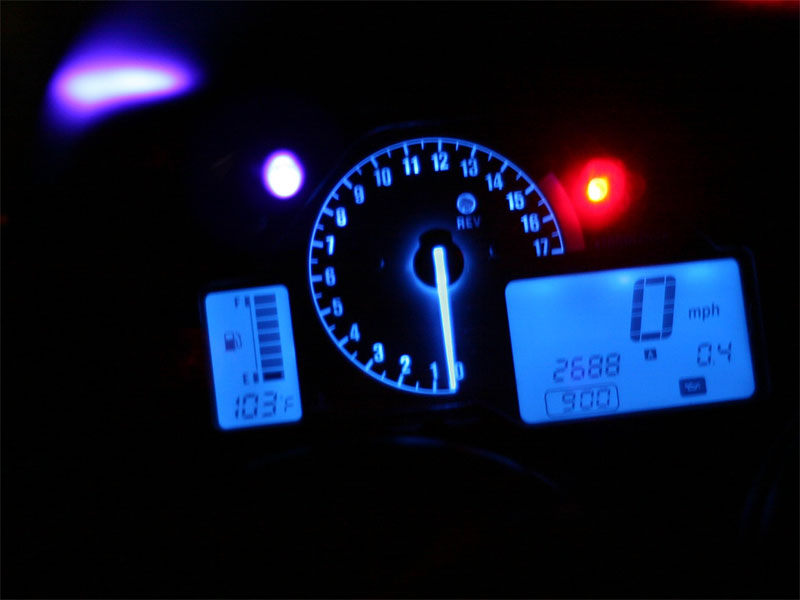
At this point you can plug in the Speedo and test your setup is good all LEDs light
and the display is functional if everything works as it should you can now cover all

connection in hot glue front and back be sure to keep the mounting holes clear
as noted in pics

Image


Image


Image


Image


Image
 
#2 ·
NICE WRITE UP!!!! That's awesome. So.....say I send you my cluster and you do it for me. How much?? You should be an entrepreneur and make a few books doing this for lazy people like myself, or people that don't feel comfortable taking apart and soldering components. Just a thought ;-)
 
#5 · (Edited)
me too,, i aint good with tiny things like resistors,, especially with my sausage fingers,, never mind soldering, looks pretty good,, although there is still a defined light pattern bleeding over,, none the less great job and excellent articulation!!!!!!!!!! , how much to do it for me also,, and what kind of turn around,, looks like you got a little business coming your way!
 
#7 · (Edited)
not sure but i think he means to scuff em up to dull the clear part to dispers or dull the light so its not a defined sharp beam,, then again what do i know? is the LCD over powering? meaning does it blind the rider from seeing the info that is displayed? is it possible to get a pic with info on the gauge. just curious how bright it is when actuall info is displayed...
 
#9 ·
im wondering if you take the filter out and leave the rest how you would be? where did you get the twist ins,, and how easy is that to do? any info you can post or email,, would rather not do full blown surgery as my illumiglos are a deep blue also,,, not the sky blue backlit like my brothers setup.. got a pic XENO Bambino?
 
#10 · (Edited)
got the leds from here Autolumination Instrument Panel Light Bulbs & Lamps) they are the smt Neo - Wedge LED type A with the 8mm base the ones they say are new and 30% brighter just have to scroll down that link i gave ya

also i did take out the filter its an easy mod doing it this way not hard at all but im with u on the open heart surgry of my cluster lol :)

that place that sold me the leds did tell me in maybe a month they will have Neo Wedge Based Incandescent Bulbs in type A size they are having them made they told me
just wondering if they would work better then leds

ill try to get ya a pic tomorrow
 
#11 · (Edited)
XENO,, what all is entailed in the installation,, is it just remove the filter and twist them in and button it up? i looked at the ones you mentioned,, real eager to see the pic you post up.. thanx for the link bro!

also does it take 2 of the bulbs mentioned,, it appear that near that display there are only 2 holes am i correct,, ?
 
#12 · (Edited)
i changed all 5 in mine minus the turn signal and high beam but ya just twist the tabs to line up with the hole like sly said take the oarnge filter out put it back together as for the lights just twist them to unlock em and pop them out then insert the leds and twist them in place but check to make sure they are working first before u put the case back together cause bulbs can go in either way but leds only work one way if one isnt burning just switch it around + to + - to - :)

and there are 3 bulbs by the display 1 top 1 bottom and 1 between the tach and lcd
 
#16 ·
As for anyone that wants the Gauge Cluster i did in the Guide its up for grabs its a 2000 model with 220 top speed only issue is the LCD screen is cracked near the connection area so it doesn't display all the characters all that you would need to do is take off the frame and swap out your LCD for that one easy enough 68.00 shipped to lower 48 sorry no shipping outside USA will be sent USPS Priority Mail
Paypal Only first come first serve
 
#17 ·
hey Scott, that looks awesome. what type/brand/model of soldering iron/gun do you use/recommend for a small job like this, or for that magic box you built me?
(btw i finally got the Schnitz order placed so ill have the brackets finished soon :) )
 
#21 ·
15-Watt Soldering Iron with Grounded Tip - RadioShack.com

Image


as for doing the gauge clusters for people here I'm still pondering weather i want to or not
time is something i don't have a lot of ,but maybe as long as patience is kept my only free time is on the weekends so if you ship it and i get it on a Tuesday it wont be done and shipped till the following Monday so keep that in mind once i have thought it over ill let all who inquired know
 
#23 · (Edited)
oh ya sly since u seem to be such a wiz with electronics u think u could come up with a way to listen and control an ipod while riding wirelessly? :crazyloco:
yea its called an FM transmitter for an ipod that will transmit on an empty FM station then all ya need is a FM radio and ear buds then everyone within range could listen
as for controlling its functions thats easy enough I'm sure they have wireless remotes for ipods too

hey sly, any chance you could completely redo a cluster with that type of LED?
if you mean all the lamps to LEDs i guess so but thats what illumiglow gauges are for lol
 
#20 ·
wheres the pic XENO Bambino? talked to those guys at that website you posted above,, they dont seem to think the incandescent will work as well as what your running right now..?? is your legible at night or is it too dim? you cant swap the guts from yours to Slys?
 
#27 ·
Zum there are different configurations of the illumiglos,, in the day light mine are white,, but at night,, mine look like your pic above except for the glowing needle,, my brothers set back light the face and it makes it very distracting,, i will try and post a pic tonight,, dont get me wrong i like that glowing needle doohicky,, but i like what i have now so it will stay,, now as soon as i see how XENOs gauges look,, i might bombard the gauges with twist ins until we see what Slys plan are..
 
#29 ·
Yeah, I'm waiting and watching too. I'd like to go with some white gauge faces (like Wylde's) and some blue bulbs for the display panel - just do it all at once. Slykitty's conversion is very sweet, but I think a bit more than I'm comfortable trying. I'm hopeful that the little blue twist in bulbs will be good enough.
 
#30 ·
Yea,, and while were on the topic of LEDs,, there once was a thread about an LED that fit in place where the little running light is above the headlights,, anyone know where the thread is or even better what part# that little suckers? and who might carry em...
 
#35 · (Edited)
Wylde - No thread needed. The "city light" is a 501/194/T10 (I believe they are all the same), but I got mine on ebay for a few bucks. You actually can just pop it out, go to your local Pep Boys/Autozone/Murrays. I'd bet they have one. Mine is blue. Really noticeable.

Why isn't there a thread on how to post pics??? And where do you guys get the emoticons??? I can't fine em anywhere :-(
 
#32 · (Edited)
HMMM,, now im thinking that Xeno might be on to something,, if your saying they are too bright,, then the glass incandescent bulbs might be the way to go,, they wont be available for another 2 weeks or so?????,, i would still like to see a pic!,, im not sur eif AFKAN had that set up in the thread he was posting pics on..PING
 
#40 · (Edited)
here is the pic u wanted not the best quality took it on the fly with my phone lol but gives ya an idea what it looks like , just wish i could get it looking like sly's :angry:
i still think that regular blue bulbs will work better i think the light will spread better then leds well thats what comes stock and it lit up good
might still send mine to sly and let an expert do it tho lol i like the color he got his, what im looking for

Image


took that pic while i was installing my new mototeck undertail lol :crazyloco:

Image


zum look like i did it right? color matched up pretty good i think